Friday, February 26, 2010

Special Edition: Brazil!

I'm off to Brazil today, and am not returning until the 21st of March. Needless to say, I won't be doing a lot of cooking there, but I WILL be eating!
What do they eat in Brazil, you ask?
Feijoada! This is described by Wikipedia (I love that Wikipedia has become my source of all this food knowledge...) as a black bean and meat stew that is popular at a meal on Wednesdays and Sundays. I am sure I'll be eating this, but can't guarantee that it will be on a Wednesday or a Sunday. I'll report back. I'm not sure I'll end up cooking this dish, as I'm not much of a meat-eater, but I'll definitely give it a try.
What else do Brazilians eat? Coxhina, which is a chicken croquette shaped like a chicken thigh. It looks appealing. I believe salgadinhos, which are like tapas-type snacks, are pretty popular, and sold on the streets. I LOVE street food, so that sounds fun!
But the more important question is... what do Brazilians DRINK!?
Caipirinhas! This is the national cocktail, made with an alcohol made from distilled sugarcane, called cachaca, mixed with limes and sugar. I've had them before, but obviously not in Brazil, so I'm looking forward to trying them there.

Lest you think I am going to Brazil merely to try the food and drink, I should explain more... I'm taking a class at the Yale School of Management and working with a group of MBA students as a consultant for a social enterprise business in Sao Paulo. The best part? The organization is called Gastromotiva, and they train young adults from the favelas (the slums) in gastronomy, catering, and business management skills. I'm sure I'll learn a lot while I'm there, and also have a chance to try a lot of local food in the process!
When I return, I'll be sure to post some pictures of my meals there, and then continue on in my International Cooking Challenge. (Our pasta maker arrived yesterday!! I can't wait to make homemade spaghetti!!)

Sunday, February 14, 2010

Haitian Spaghetti

The History:
Bonjou! Kijan ou ye? Nathan and I have been taking Haitian Creole from Met Lamothe, our language professor for the past semester and a half. Met Lamothe has described various aspects of Haitian culture, including cooking, and we decided to invite him over for our lesson last Friday, and I hoped to recreate a favorite Haitian breakfast dish for him.
Haitian spaghetti, according to Met Lamothe, is eaten by all Haitians- the rural villagers, the elite, the residents of Cité Soleil, and everyone in between. This seemed like a good dish to start with, and sounded manageable enough.

The Process:
 Having grown up with American spaghetti, this dish required me to move beyond the habit of boiling noodles in water and then adding sauce. Haitian spaghetti is (apparently) more about the flavor of the noodle than the sauce that is coating it. It was also a relief to cook everything in one pot- after the pierogi and gnocchi, my kitchen (and the resident dishwasher, Nathan) needed a break from foods that require 17 bowls to make them in!

The Recipe:
This recipe came from Met Lamothe. He described the spaghetti several times in both Creole and English, so I had to cobble together the recipe from the two languages. I also double-checked it with a Haitian friend's mom. Despite all that, I still had no idea what I was doing. But... it was easy enough.

1 lb spaghetti (normally we use whole wheat noodles, but I used regular noodles for authenticity's sake.)
1 onion, chopped
4-5 whole cloves (Met Lamothe never specified how many, I used 12 which was over-clovey.)
2-3 cloves diced garlic
lots of oil
2 T tomato paste (Though I used a bit more. Taste as you cook the noodles and add more as needed.)
1/2 cup diced fresh parsley
sprinkling of sugar (Many Haitians make this dish with ketchup, we didn't have any, so I added a dash of sugar to sweeten things up.)
salt to taste

Saute the onion, garlic and cloves in oil in a saucepan. Then, add the tomato paste and parsley, fry together for a minute until a tantalizing smell is gushing from the pot. Add about a liter or so of hot/boiling water, then add the spaghetti (broken in half.) The goal is to cook the spaghetti in the sauce until the noodles are cooked but not overly saucy. Most of the water should get absorbed or boil away, but add water as needed until the noodles are cooked. (I kept a lid on for most of the process to aid with cooking the noodles.) When serving, warn your guests about the presence of whole cloves so they don't accidentally consume them. 

The Results:
I can tell that this dish is an acquired taste. I actually LOVED the presence of the cloves- it gave the sauce/noodles a spicy depth and I'd definitely cook with clove in savory/tomato-based dishes again. I've also never made spaghetti like this (cooked in it's own saucy water) and thought the texture was delicious. Between the clove and the flavor and texture of the noodles, I didn't think parmesan cheese was necessary- and usually I mound heaps of cheese on my noodles! I've also been discovering a passion for parsley, surprisingly, since it's usually used as a bland garnish at restaurants. I've been enjoying integrating it into dishes.
Was it authentic? I apparently overdosed on the cloves (I used about 12, Met Lamothe said perhaps 4 would be ample). I also added more tomato paste than a Haitian would, but I liked it that way. Met Lamothe had 3 servings, so I think I did alright. I think the cloves really made this dish unique.
Would I make it again? Yes- I'd use more tomato paste, and seriously loved the cloves. It was easy and savory and made for a really satisfying breakfast.

Tuesday, February 9, 2010

Gnocchi (?)

The History: In Italian, "Gnocchi" means "lumps". (Indeed, this proved to be true.) They have been around since the Romans, for over 2000 years. Fun fact: one type of gnocchi is called "strangolapreti" which means "choke the priest". Unfortunately, wikipedia did not elaborate on how this name came about, so we are left in suspense. Moving along...

The Process: Like mole sauce, gnocchi seems to have a plethora of recipes and techniques- I imagine each Italian family has strong thoughts regarding the 'best' way to make gnocchi. So, like the mole, I took hints/tips from a few different recipes and dove in.
Nathan and I have been planning to make gnocchi for months, and bought a potato ricer several months ago. This is a seemingly essential tool- it looks like a giant garlic press and made the preparation of the potatoes infinitely easier than mashing them.
I will admit- my usual "cowgirl in the kitchen" tactics didn't work so well this time- gnocchi were messy and a lot of work, and I really had no clue what I was doing. This recipe takes a lot of counter space (for spreading the riced potatoes) and dirties a lot of baking sheets. However, like the pierogi, you could spend an hour making a few gallons of gnocchi and have ample supply for months of gnocchi eating--possibly making the preparation/messy kitchen worth it.

The Recipe:
I'm going to reference the Epicurious.com recipe for this one. That said, no one recipe is going to explain the whole process well, so I recommend doing a few google searches and exploring the gnocchi-underworld of the internet before starting.

3 Idaho potatoes (whole, with skins, scrubbed)
1 whole egg
1 t. nutmeg (bonus points if freshly ground!)
salt/pepper
1/4 cup parmesan cheese
somewhere around 2 cups of flour

Boil the potatoes whole until tender (about 30 minutes). Once you can touch them without severe finger pain, peel the skins off (should be easy to peel). Lay out 2-4 baking sheets, and press the potatoes through the ricer, creating thin layers on the baking sheets. (This part is fun- it's like those Playdoh kid's toys!) Once the potatoes are cool, place them in a large bowl, then add about a cup of the flour, the (beaten) egg, nutmeg, salt, pepper, and cheese. Mix (it's easiest to just use your hands) adding more flour as needed, until the dough is almost like bread dough. (The 'almost' is critical- don't make this a floury glop!) Try not to overmix.

(Wash the potato goo off your hands.) Then, taking handfuls of the dough, roll it out on a floured surface into snakes that are about 3/4 inch thick. Cut the rope into 1 inch bits. Then (this is the hard part) using the tines of a fork, create ridges on the gnocchi blobs, then place on a floured pan. I wish I could go more in depth on this ridge-creating nonsense, but to be honest, I couldn't figure it out. Nathan and I made the gnocchi together, and with his greater patience levels, he was able to create prettier gnocchi than I was. I got antsy and started haphazardly squashing the gnocchi with my fork. Whatever works for you. (On the picture below, can you tell which gnocchi are mine, and which are Nathans?)

If you're going to freeze them, freeze them on the pan, then, once frozen, put them in a plastic bag (like the Pierogi), or if you're going to cook them, set aside.

To cook: The most critical thing? DON'T OVERBOIL. We made 3 batches of gnocchi to see if they were turning out and the first few were like mushy wet blobs of mashed potato. Frying them in butter only slightly helped. After you place about a dozen or so gnocchi in the boiling water, remove them a few seconds after they float. It's probably best to plan on lightly frying/sauteing them in butter/olive oil so they regain some shape. I fried ours with a little tomato sauce and topped them with parmesan, then yesterday made another batch for lunch, and (after over boiling them) added spinach and butter, which was yummy.
 
The Results:
I don't know. They were nothing to brag about- the process was fun, though we actually made double the recipe so it involved a lot of dough shaping. I think the main problem is twofold:

1. I like firm gnocchi, like the kind from Romeo and Cesares, my favorite Italian grocery shop. My homemade gnocchi were fluffy and pillowy, which is apparently what gnocchi are supposed to be like, but I was expecting a firmer texture.
2. I can buy said gnocchi from R&C for fairly cheap, my kitchen won't be covered in riced potato and flour, we won't have an hour's worth of dishes to wash, and the gnocchi from R&C have a identical, prettily ridged appearance.

Will we make them again? Yes. In smaller batches, and possibly with sweet potato. (Nothing beats sweet potato gnocchi with brown butter and sage!)

Saturday, February 6, 2010

Pierogies

The History:
Pierogi are popular in a variety of Slavic countries, and their name, apparently, comes from the "proto-slavic" root "pir" which means festivity. I like festive foods! Controversy abounds on popular recipe sites like Epicurious and Allrecipes.com, with commenters heatedly discussing whether the recipe has been "too Americanized" or whose Polish grandmother's pierogi recipe is more delicious, or whether cheddar cheese is an acceptable stuffing. I entered the fray...

The Process:
Slightly less work, but more mess than mole sauce, I spent much of Friday afternoon preparing pierogi over at my friend Walker's house. Not only does she have 2 dogs and a cute baby, but her kitchen is about 10 times bigger than mine, so it was a perfect location- and she was kind enough to host me and my 6 cups of flour and 10 lbs of potatoes. The dough recipes seemed straightforward enough, the challenge was in picking the filling. This dish is perfect for an improvisational chef like myself- any combination of mashed potatoes, cheeses, mushrooms and/or vegetables (or bacon, if you're so inclined!) would probably be delicious in pierogi dough. It's also a great dish to make in advance in bulk: together, Walker and I made about 10-12 servings of pierogi, froze them on baking sheets, then put them in a ziplock in the freezer- perfect for last-minute meals!
It's a bit messy, though, so clear off your counters (and make room in the freezer if you're freezing them) before you start.

The Recipe:
There are three parts to pierogi: The dough wrappers, the filling, and whatever sauce you cook them in.
The filling: Note: This recipe is perfect for improvising. What do YOU like in pierogi? Let the creative juices flow! I made three fillings composed of combinations of the following ingredients.
-mashed potatoes (however you like them, but thick in texture) with parsley
-sauteed mushrooms with onion and garlic and parsley
-extra sharp cheddar cheese, grated or cubed
-feta cheese, diced finely

I recommend combining the potatoes with one or two flavors (mushroom and feta, or feta and bacon). You'll want about 4 cups of filling for the dough- that might even be too much, but as Walker suggested, you can make the extra potato filling into latke-like patties the next morning!

The dough: I actually followed the recipe this time. (Though we doubled it to make more pierogi.)
3 cups flour
1 egg
1 cups milk or water
1 T. olive oil
pinch salt
Mix the wet ingredients, then mix wet + dry. Knead the dough for about 5-8 minutes (or until you're tired- it's thick dough!), cover in plastic wrap, and set in the fridge for 30 minutes or so.

The sauce: Again, get creative. I made a sauce of sauteed mushrooms, onions, tomatoes, garlic and butter, with lots and lots of fresh parsley. The tomato was great because it lent a lot of brightness to the dish, both in terms of color and flavor!

How to make pierogies: Once the dough is chilled, divide it in half, and roll out half on a floured surface until it's about 1/16th inch thich- or until it's almost see through but not flimsy. Take a drinking glass that is about 3-4 inches in diameter, and cut circles from the dough, placing the circles on a floured surface. Then, spoon about 1 tablespoon of filling into the center of each circle. It may be easiest to hold the circle in your hand- dab egg white around the edge of half the circle, and fold in half to create a half-moon shape. Press the edges together, then use fork tines to smush them down in a pretty, professional manner. Set aside on a floured surface.

Once you've made your pierogies (we doubled the dough recipe and created about 90 or so pierogies), you can either place them on a lightly floured baking sheet and freeze them for later use (once they're frozen, put them in a freezer bag, and they won't stick together) or place them in boiling water for about 5 minutes. (They should float about a minute after you place them in water.) Then, saute them with a bit of butter or oil and whatever sauce you've created.

The Results:
I was dubious about making pierogies- I've only had the store-bought kind and the mystery of boiling dough seemed impenetrable to me. However, all in all, these were simple to make, if time-consuming and messy. If you're looking for a fun afternoon of cooking (preferably with a friend and a glass of wine and/or a cute gurgling baby) this is a great dish.
The pierogi turned out great- chewy (in a good way) and fresh tasting dough, fillings with way more flavor than the store-bought kind, and plenty of fresh parsley. It was fun to create something that was previously so mysterious, and I imagine this recipe will become a part of my repertoire. I think home-made pierogi would also make a great gift to bring to someone's house (if you're as into gifting food as I am)!

Let me know if you try it out!

*You'll note that I've added Haitian food to my list, which is deliberately vague as I'm not sure which dish to attempt, but Nathan and I are taking Creole and our professor keeps talking about Haitian recipes, so I think I'll try something out next week.

Monday, February 1, 2010

Mole Sauce

The History:
Mole sauce comes from Mexico- mole means "concoction" or "sauce", and, according to Wikipedia is defined as a thick, homogenous sauce with complex flavors. Sounds about right. Wikipedia listed 9 different types of mole, from different regions, and using different combinations of chiles, nuts, vegetables and spices.

                                                                       The Process:
It's a lot of work. I'll put that out there first. First of all, I had to find a recipe. I googled and found dozens of seemingly legit recipes, but each recipe was totally different. (There was even one that said: buy a can of mole sauce at the store in the ethnic foods aisle, heat, and add shredded chicken. Um, no.) There were very few common denominators in the recipes (besides chocolate and chiles). I ended up compiling a list of the most often mentioned ingredients and made a run to the Italian grocery store (which unfortunately did not have ancho, mulato or pasilo negro chiles- or tomatillos, but did have plain old jalapeno chiles).
I also assumed that since there were at least 15 completely different recipes, I couldn't go too wrong with experimentation, as long as I included some type of chile and chocolate. Perfect- experimentation cooking is my favorite!
There are also a lot of steps involved with making mole sauce no matter what recipe you go with. There's roasting, frying, boiling, toasting, broiling, puree-ing, dry-roasting, and a lot of grinding. All this will lead to a greater appreciation of a really good mole sauce at a hole-in-the-wall Mexican restaurant.

The Recipe:
What follows is vaguely what I did to make my mole- I'm getting the idea that everyone's mole is a little different and depends on what they've got in their cupboards. (One recipe included frying a piece of french bread in butter and throwing it in the sauce, pre-puree. I skipped this, I think it was to thicken the sauce, but mine was plenty thick.) I've also written the recipe to make it easier to use. If you do make mole (my version or any other) I think because of the plethora of spices and flavors, you really can just eyeball it, and use whatever inspires you. And I also think that amounts/measuring isn't terribly important. (Maybe this is sacrilege in the mole world, I don't know.)

Jordan's Invented Mole:
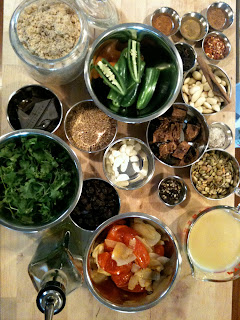
1. Veggies: Chop 2-3 tomatoes, 5-6 garlic cloves, and one onion into largish chunks. Toss with olive oil, and roast in the oven at 350 degrees for 20 or so minutes, stirring once to prevent burning. Set aside.

2. Broth: Simmer (in a large saucepan) one container of chicken (or veggie) broth (I used the free-range happy chicken kind from Trader Joe's, but any broth should work) and one cinnamon stick, and about 1/2 cup of raisins. Once it's simmering, add the veggies from step one.

3. Chiles: I used fresh jalapeno and whole dried chipotle chiles, but the recipes also suggested ancho, mulato, and pasilo negro chiles. Use whatever interesting chiles you can find at your grocery store. Cut the stems off the chiles, discard, and loosely chop the chiles, then heat a dry frying pan to medium-high heat. Dry-toast the chiles on the frying pan until they are popping and blistering, but not smoking. Add to the broth mixture. I used 3 dried chipotle chiles, and 4 fresh jalapeno. In retrospect, this was too much.

4. Nuts: Recipes called for one or more of the following: peanuts, pinenuts, almonds, sesame seeds, pumpkin seeds. I had the last three, so I used them all. I toasted all three on the dry frying pan until they were lightly browned. (First I peeled the almonds by putting them in boiling water for a minute, the skins slid right off.) After the nuts/seeds were toasted, I set them aside. (I used about 1/2 cup almonds, 1/4 cup each pumpkin seeds and sesame seeds.)

5. Spices: I used about 1+ tablespoon total of the following spices: Cumin, cinnamon, cloves, nutmeg, peppercorns, chili flakes. I had whole cloves and peppercorns, so I ground them in my Samoan spice pounder. Toast all of the spices on the dry frying pan.

6. Grinding: I scrubbed the coffee out of our coffee grinder, then ground the nuts, seeds, and spices in batches, but reserved about 1/2 tablespoon of the sesame seeds because I thought the sauce would look nice with a few sprinkles of sesame seeds. It did.

7. Combine everything (ground nut/spice mixture) in the saucepot, add more broth if necessary (to make sure everything is covered.) At this point, I threw in a small handful of fresh cilantro, because why not?

8. Puree. I have a fantastic immersion blender which has changed my life. (I recommend one- makes blending/pureeing so much easier than transferring everything to a blender!)

9. For some reason, every recipe at this point said to heat several tablespoons of oil (one said lard... but no thank you) in a larger saucepan, then add the sauce, and simmer for 60-90 minutes, then add the chocolate (3.5 oz) and then simmer another half hour before cooking. So since there was consensus, I did this step. I think it was perhaps unnecessary. I think you could just simmer the pureed mixture, then add the chocolate towards the end. Whatever floats your boat.

10. Finally, (I told you this was a complicated sauce!) I boiled and then shredded happy, free range chicken breast, and added that to the mole sauce.

The Results: 
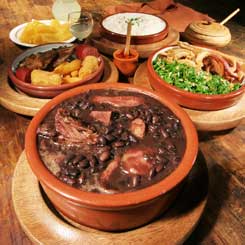
After all that, it had better be good, right? I tucked the mole chicken in a tortilla with cubed sweet potatoes, and served it with slow-cooked black beans (thank you crock pot!) topped with yesterday's chimichurri sauce (Argentina, meet Mexico!) and a side of sauteed kale (kale sauteed with garlic, lemon, butter, and honey, which is an exquisite combination!). It was one of the most flavorful meals I've had in a long time. The mole was wonderful- complex, spicy (really spicy), chocolatey, but not in a gooey way, and boldly rich.

In the future, I will likely order mole at restaurants to get new ideas, and may make (every once in a while) a gigantic batch of mole to freeze in one-cup containers to use on occasion. The sauce was incredible, but a lot of work, and more involved than I have time for every night. Plus, we rarely cook chicken at home (once every 2 or 3 months?) and I'm honestly unsure what else you do with mole sauce. (It doesn't seem right to put tofu in it.)  I will also use less spice. One of the problems with eyeballing it is getting overenthusiastic about spices and over-doing them.
I'd also like to try using different types of chiles, but that will probably have to wait until I leave New Haven and it's dearth of Mexican grocery stores.
Let me know if you attempt mole- or if you have an easier recipe, or if I broke the sacred rules of mole making in the process of devising my own recipe!